Automatic garden irrigation system
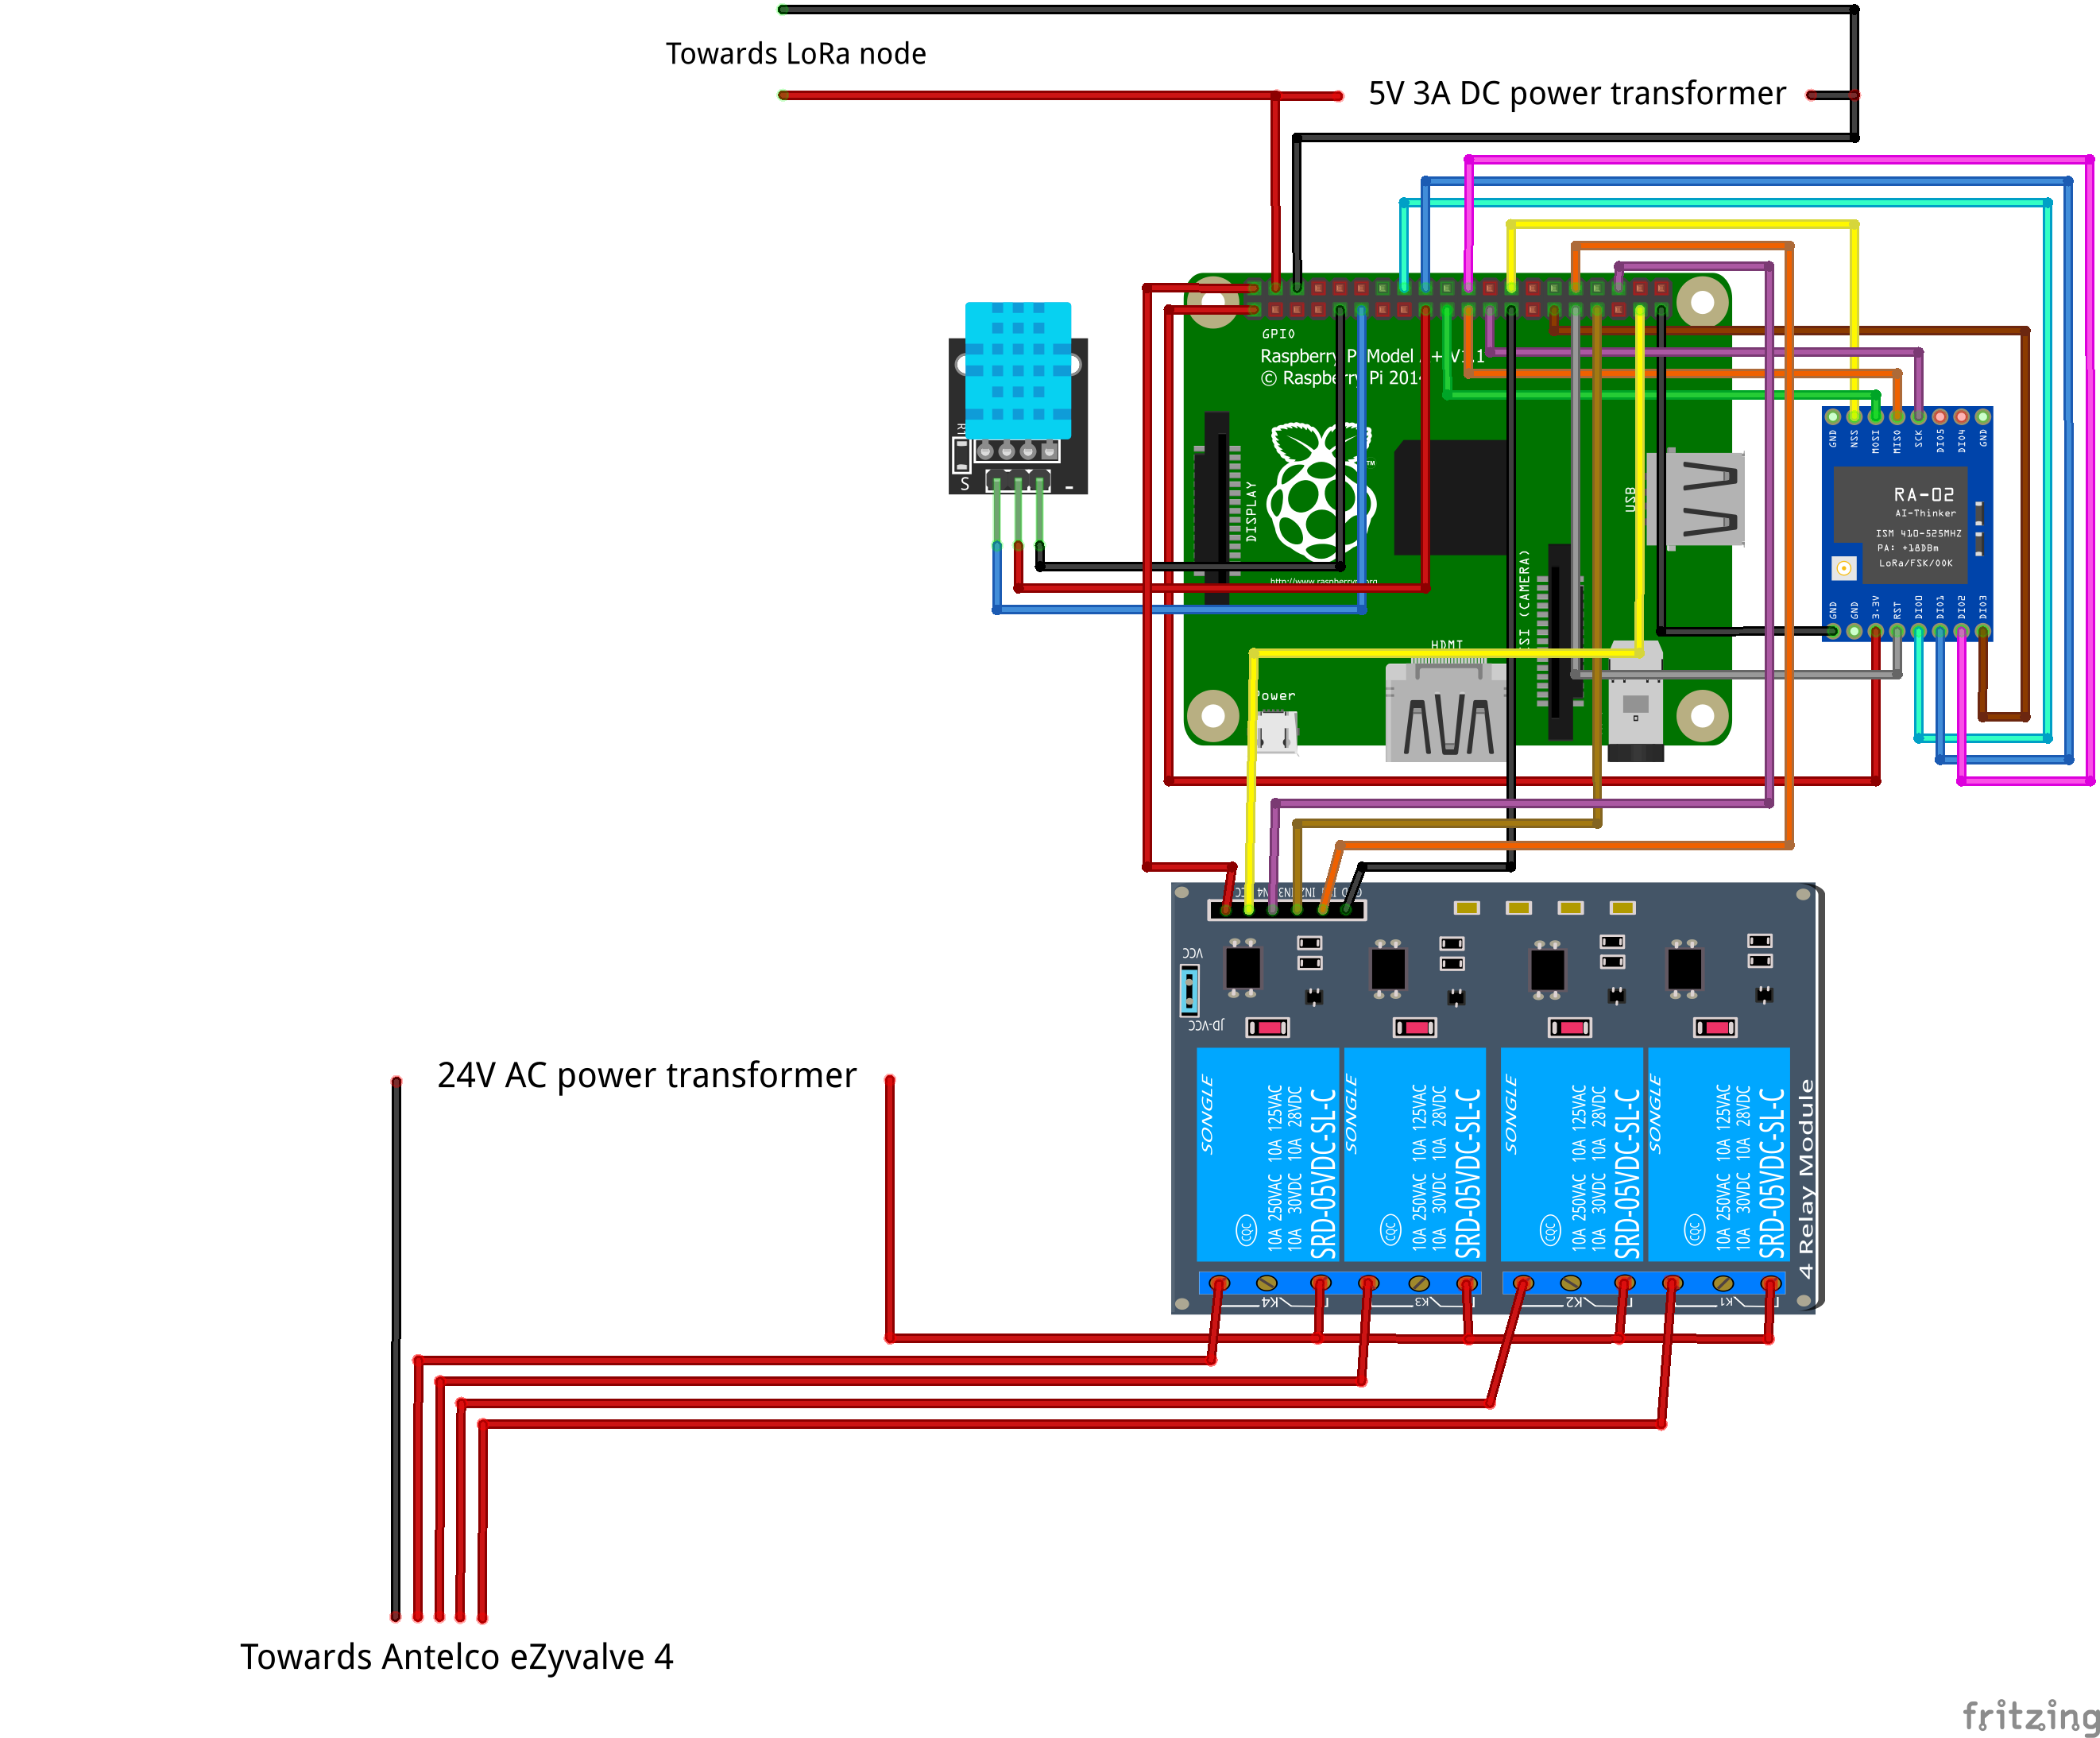
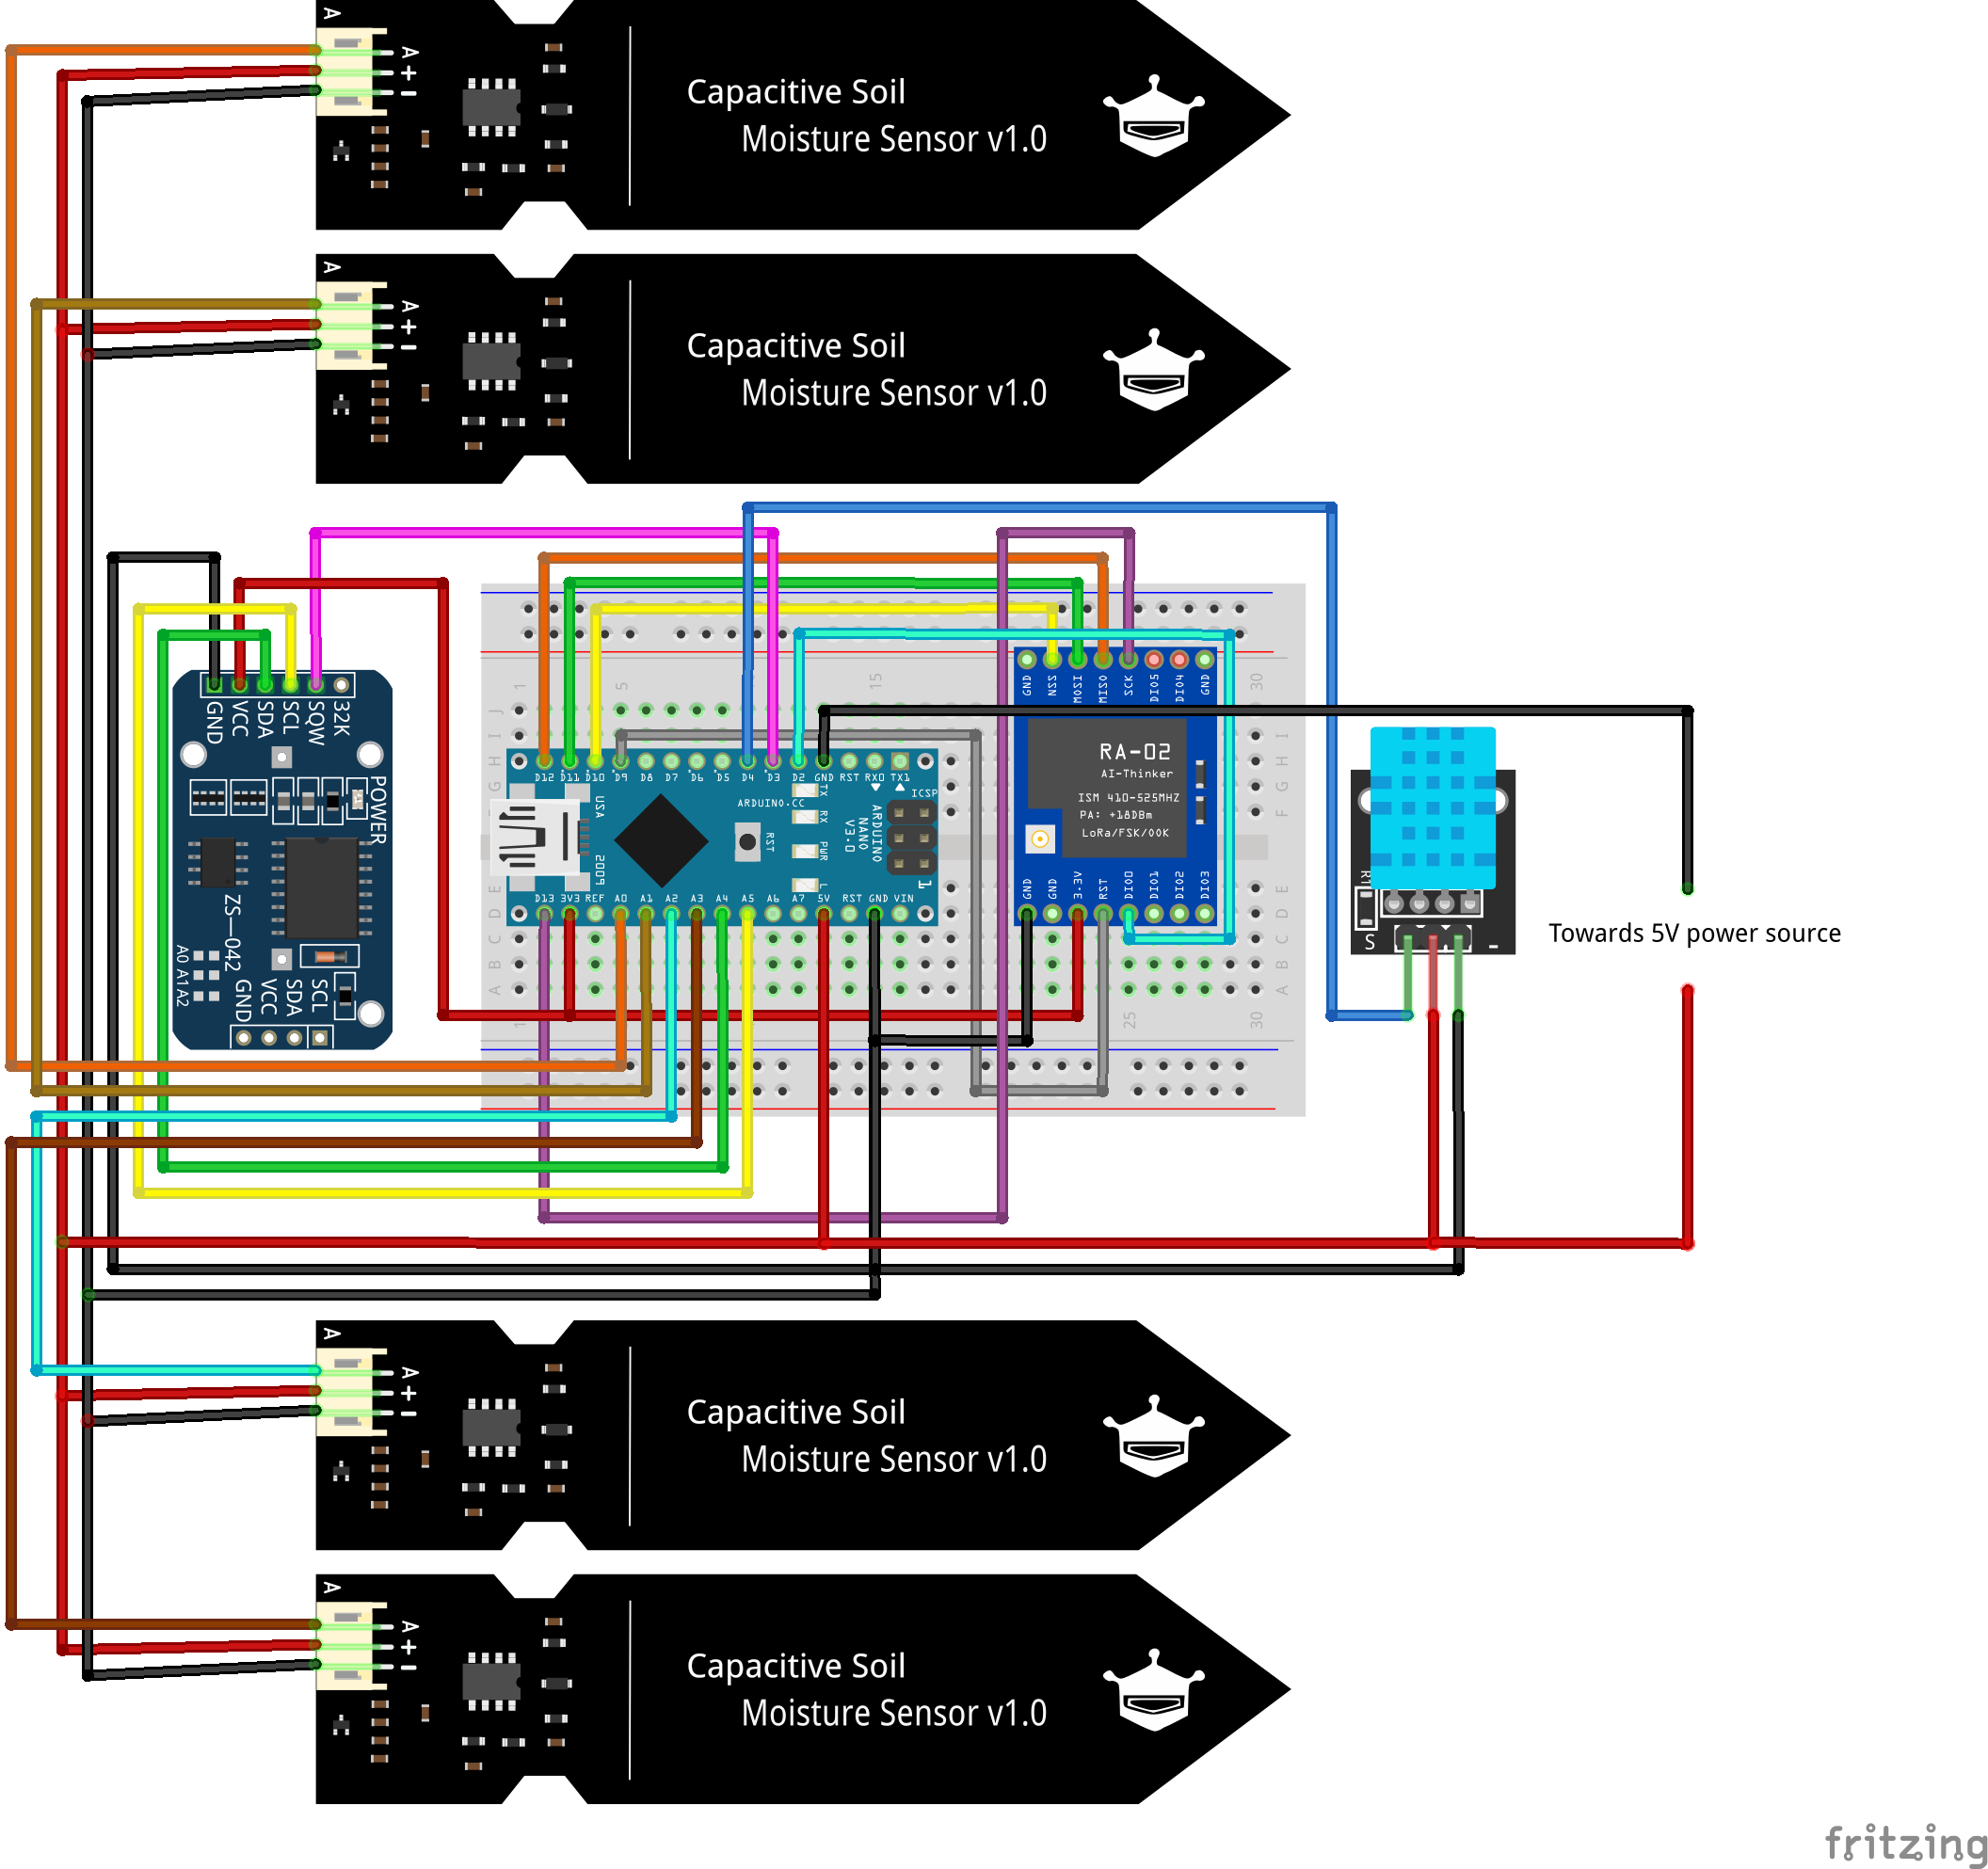
Thanks to some reading online and hours spent assembling the parts and finetuning the software, I am now successfully running a fully-customised automatic garden irrigation system at home. In a nutshell, the sytem consists of a master box (Raspberry Pi) operating the mudpi software and a passive node (Arduino) sending data for air temperature and humidity and data from 4 soil moisture sensors to the master box. Every evening, the master box triggers the valves of an Antelco ezyvalve 4 depending on the readings of the soil moisture sensors. This way, I can water 4 areas with different watering needs (2 vegetable gardens, several large plant containers, a bunch of smaller flower pots).
Below is a summary description of the installation steps of the master box and the passive node.
Master box (Raspberry Pi)
Installing PyLoRa library and the homemade LoRa communication script
The LoRa module works with the SPI protocol, so we have to enable the SPI interface of the raspberry pi:
# sudo raspi-config nonint do_spi 0We will then install the python libraries to control the SPI and GPIO interfaces:
# sudo apt-get install python-rpi.gpio python3-rpi.gpio

# sudo apt-get install python-spidev python3-spidev
Next, from the pi folder (/home/pi), install git and use it to download the PyLoRa library and example files:
# sudo apt-get install git

# sudo git clone https://github.com/rpsreal/pySX127x
Finally, download this homemade python script and place it in the /home/pi/pySX127x folder.
Running homemade python script as a service
In order to run the homemade python script as a service and restart it periodically (since I noted that the script occasionally stops working), you can create the following systemd unit files: lora.service, lora.timer and oneshot.timer in the /etc/systemd/system directory.
The first file will run the python script once the service runs:
# sudo nano /etc/systemd/system/lora.service[Unit]
Description=Acquisition of LoRa data
After=multi-user.target
[Service]
Type=simple
Restart=always
RestartSec=30
ExecStart=/usr/bin/python3 /home/pi/pySX127x/lora.py
[Install]
WantedBy=multi-user.targetThe second file will restart lora.service:
# sudo nano /etc/systemd/system/oneshot.service[Unit]
Description=One shot service
[Service]
Type=oneshot
ExecStart=/usr/bin/systemctl restart lora.service
[Install]
WantedBy=multi-user.targetThe third file sets up the systemd timer that triggers the oneshot.service file every hour:
# sudo nano /etc/systemd/system/lora.timer[Unit]
Description=Run LoRa service periodically
[Timer]
Unit=lora.service
OnCalendar=*-*-* *:00:00
[Install]
WantedBy=timers.targetOnce done, run the following commands:
# sudo systemctl daemon-reload

# sudo systemctl enable lora.timer

# sudo systemctl start lora.service
Installing mudpi and keeping it running with Supervisord
Mudpi's installation is pretty straightforward thanks to this installation script:
# curl -sL https://install.mudpi.app | bashOnce the installation is complete, we will need to customise the configuration file. You can replace the file /home/mudpi/core/mudpi/mudpi.config with the file provided here.
To keep mudpi running in the background, you can use a process supervisor like supervisord, which has been installed with mudpi's installer. Create/edit 'mudpi.conf' in the directory /etc/supervisor/conf.d:
[program:mudpi]
directory=/home/mudpi
user=mudpi
environment=PYTHONPATH='/usr/local/lib/'
command=mudpi -c /home/mudpi/core/mudpi/mudpi.config
autostart=true
autorestart=true
startrettries=3
stderr_logfile=/home/mudpi/core/mudpi/error.log
stdout_logfile=/home/mudpi/core/mudpi/output.log
stopsignal=INT
stopwaitsecs=180
You can then use the following commands to start, stop, restart or check the status of mudpi:
# sudo supervisorctl start mudpi

# sudo supervisorctl stop mudpi

# sudo supervisorctl restart mudpi

# sudo supervisorctl status mudpi
Passive node (Arduino)
Before installing the homemade Arduino code, you will need to add a number of libraries first to the Arduino software:
- DHT sensor library https://www.arduino.cc/reference/en/libraries/dht-sensor-library/
- DS3232RTC library https://github.com/JChristensen/DS3232RTC
- Radiohead library https://github.com/PaulStoffregen/RadioHead
Then, open the the homemade Arduino code and upload it to your Arduino board.
That's about it! Of course, things might not work as planned and, if so, do not hesitate to comment under this page!

